


Showing posts with label handmade. Show all posts
Showing posts with label handmade. Show all posts


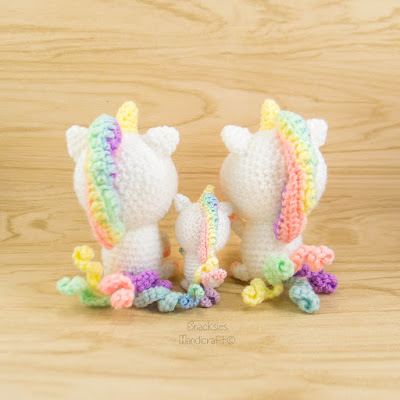
Unicorns
Have been busy making unicorns for orders and decided to try making a mini unicorn with lace yarn! It is challenging to make due to the small size and my fingers hurt from all the sewing but I am very satisfied with the results :) The mini unicorn is only about 2 inches tall including the horn and look so cute!


Vacation 20th Dec - 30th Dec

I will be on vacation from 20th Dec to 30th Dec.
Made-to-order amigurumi purchases made after 8th December will only be shipped out in Jan 2017.
Safety eyes purchases made after 18th Dec will only be shipped out in Jan 2017
Pattern purchases are not affected.
Amazon store will be on vacation from 8th December. Etsy store will remain open with adjusted turnaround times.
Sorry for the inconvenience and thanks for the support this year.
Happy holidays!!
Merlion Amigurumi Pattern (Free)
Did a cute version of the Singapore Merlion last year and had requests for the pattern. Finally finish writing it!

This is a free pattern, please do not sell this pattern or claim it as your own. If you want to share this pattern, please link back to this page.
Materials:
Using fingering yarn with 2.5mm hook will produce a Merlion of about 11cm/4.3in tall.
All yarn threads are assumed to be of the same thickness.
-White
-Red yarn
-Light Pink Embroidery Thread
-Black Embroidery Thread
-Safety Eyes 6mm x 2 (based on fingering yarn, use a bigger size if using a thicker yarn)
-Stuffing
Abbreviations:
sc - single crochet
sc inc - single crochet increase
sc dec - single crochet decrease
ss - slip stitch
ch - chain stitch
hdc - half double crochet
dc - double crochet
dc inc - double crochet increase
bo - bobble stitch with 3 double crochet
Rnd – Round
Head & Body
With white yarn,
Rnd 1: 6sc into magic ring (6)
Rnd 2: sc inc x 6 times (12)
Rnd 3: (sc, sc inc) x 6 times (18)
Rnd 4: (2 sc, sc inc) x 6 times (24)
Rnd 5: (3 sc, sc inc) x 6 times (30)
Rnd 6: (4 sc, sc inc) x 6 times (36)
Rnd 7: (5 sc, sc inc) x 6 times (42)
Rnd 8: (6 sc, sc inc) x 6 times (48)
Rnd 9 - Rnd 15 (7 rnds): sc all around (48)
Rnd 16: (6 sc, sc dec) x 6 times (42)
Rnd 17: (5 sc, sc dec) x 6 times (36)
Rnd 18: (4 sc, sc dec) x 6 times (30)
Rnd 19: (3 sc, sc dec) x 6 times (24)
Rnd 20: (2 sc, sc dec) x 6 times (18)
Insert the eyes between Rnd 10 - Rnd 11, about 8 stitches apart.
Sew the nose and mouth from Rnd 11 - Rnd 12.
Sew whiskers from Rnd 11 - Rnd 13


Rnd 41: hdc, dc inc, ss, hdc, dc inc, hdc, ss, (hdc, dc inc, ss) x 2 times,
hdc, dc inc, hdc, ss, hdc, dc inc, ss (26)
Stuff the tail portion lightly as you need to fold it later.
Flatten the tail portion and sew the hole close.


Mane
With red yarn,
Rnd 1: ch 56, ss to make into a ring (56)
Rnd 2: sc all around (56)
Rnd 3: (6 sc, sc inc) x 8 times (64)
Rnd 4: (hdc, dc inc, hdc, ss) x 16 times (80)
Fasten off and leave a length of yarn for sewing
(Note: The mane may curl up and you may want to block it to make it lay flat.)


This is a free pattern, please do not sell this pattern or claim it as your own. If you want to share this pattern, please link back to this page.
Materials:
Using fingering yarn with 2.5mm hook will produce a Merlion of about 11cm/4.3in tall.
All yarn threads are assumed to be of the same thickness.
-White
-Red yarn
-Light Pink Embroidery Thread
-Black Embroidery Thread
-Safety Eyes 6mm x 2 (based on fingering yarn, use a bigger size if using a thicker yarn)
-Stuffing
Abbreviations:
sc - single crochet
sc inc - single crochet increase
sc dec - single crochet decrease
ss - slip stitch
ch - chain stitch
hdc - half double crochet
dc - double crochet
dc inc - double crochet increase
bo - bobble stitch with 3 double crochet
Rnd – Round
Head & Body
With white yarn,
Rnd 1: 6sc into magic ring (6)
Rnd 2: sc inc x 6 times (12)
Rnd 3: (sc, sc inc) x 6 times (18)
Rnd 4: (2 sc, sc inc) x 6 times (24)
Rnd 5: (3 sc, sc inc) x 6 times (30)
Rnd 6: (4 sc, sc inc) x 6 times (36)
Rnd 7: (5 sc, sc inc) x 6 times (42)
Rnd 8: (6 sc, sc inc) x 6 times (48)
Rnd 9 - Rnd 15 (7 rnds): sc all around (48)
Rnd 16: (6 sc, sc dec) x 6 times (42)
Rnd 17: (5 sc, sc dec) x 6 times (36)
Rnd 18: (4 sc, sc dec) x 6 times (30)
Rnd 19: (3 sc, sc dec) x 6 times (24)
Rnd 20: (2 sc, sc dec) x 6 times (18)
Insert the eyes between Rnd 10 - Rnd 11, about 8 stitches apart.
Sew the nose and mouth from Rnd 11 - Rnd 12.
Sew whiskers from Rnd 11 - Rnd 13
Rnd 21: (2 sc, sc inc) x 6 times (24)
Rnd 22: (3 sc, sc inc) x 6 times (30)
Rnd 23 - Rnd 24 (2 rnds): sc all around (30)
Rnd 25: (4 sc, sc inc) x 6 times (36)
Rnd 26: sc all around (36)
Rnd 27: (4 sc, sc dec) x 6 times (30)
Rnd 28: (3 sc, sc dec) x 6 times (24)
Rnd 29: sc all around (24)
Rnd 30: (6 sc, sc dec) x 3 times (21)
Rnd 31: sc all around (21)
Rnd 32: (5 sc, sc dec) x 3 times (18)
Rnd 33: sc all around (18)
Put stuffing in.
Rnd 34: (4 sc, sc dec) x 3 times (15)
Rnd 35: (4 sc, sc inc) x 3 times (18)
Rnd 36: (8 sc, sc inc) x 2 times (20)
Rnd 37 - Rnd 40 (4 rnds): sc all around (20)
Add a few stitches until Rnd 40 end at the side of the merlion.

Rnd 41: hdc, dc inc, ss, hdc, dc inc, hdc, ss, (hdc, dc inc, ss) x 2 times,
hdc, dc inc, hdc, ss, hdc, dc inc, ss (26)
Stuff the tail portion lightly as you need to fold it later.
Flatten the tail portion and sew the hole close.

Body Details
With light pink embroidery thread, sew a wave pattern from Rnd 25 – Rnd 27.

With red yarn,
Rnd 1: ch 56, ss to make into a ring (56)
Rnd 2: sc all around (56)
Rnd 3: (6 sc, sc inc) x 8 times (64)
Rnd 4: (hdc, dc inc, hdc, ss) x 16 times (80)
Fasten off and leave a length of yarn for sewing
(Note: The mane may curl up and you may want to block it to make it lay flat.)

Ears (Make 2)
With white yarn,
Rnd 1: 4sc into magic ring (4)
Rnd 2: (sc, sc inc) x 2 times (6)
Fasten off, leaving a length of yarn for sewing.
Assembly
Sew the mane to the head.

Sew the ears to the head.
Fold up the tail and sew it to secure it.
Fold up the tail and sew it to secure it.
Hope you enjoy the pattern!

Unicorn Amigurumi
Designed another new amigurumi - rainbow unicorn!


Pop-up store!

I am participating in my first pop-up store! The pop-up store is at The People's Avenue, Orchard Gateway #02-01 and will be opened daily from 11am - 10pm until 20th July. There are a lot of other items by local crafters as well such as handmade cards, key holders, pouches, bags, necklaces, bracelets and many more. Do drop by to support local handmade! :)
LINE Moon Crochet Amigurumi Pattern (Free)
I had a few requests for pattern on the LINE Moon that I did quite a while back. So here it is! :)

This is a free pattern, please do not sell this pattern or claim it as your own. If you want to share this pattern, please link back to this page. If you are selling the finished doll, please credit Snacksies Handicraft Corner for the design.
Materials:
Using fingering yarn with 2.5mm hook will produce a Moon of about 12cm/4.7in tall.
All yarn threads are assumed to be of the same thickness.
White yarn
Black embroidery thread
Fabric Glue
Felting needle + pink felting wool OR pink felt and glue
Stuffing
Abbreviations:
sc - single crochet
sc inc - single crochet increase
sc dec - single crochet decrease
ch - chain
sc3tog - single crochet 3 together
Head & Body
With white yarn,
Rnd 1: 6sc into magic ring (6)
Rnd 2: sc inc x 6 times (12)
Rnd 3: (sc, sc inc) x 6 times (18)
Rnd 4: (2 sc, sc inc) x 6 times (24)
Rnd 5: (3 sc, sc inc) x 6 times (30)
Rnd 6: (4 sc, sc inc) x 6 times (36)
Rnd 7: (5 sc, sc inc) x 6 times (42)
Rnd 8: (6 sc, sc inc) x 6 times (48)
Rnd 9: (7 sc, sc inc) x 6 times (54)
Rnd 10 - Rnd 17 (8 rnds): sc all around (54)
Rnd 18: (7 sc, sc dec) x 6 times (48)
Rnd 19: (6 sc, sc dec) x 6 times (42)
Rnd 20: (5 sc, sc dec) x 6 times (36)
Rnd 21: (4 sc, sc dec) x 6 times (30)
Rnd 22: (3 sc, sc dec) x 6 times (24)
*With black embroidery thread, sew eyes between Rnd 10 - 13, 3 stitches apart
*Sew a loose straight line in middle of Rnd 14. Use your fingers to make a curve and use fabric glue to retain the curve.
*Sew a loose straight line at Rnd 15. Use your fingers to make a curve and use fabric glue to retain the curve.
Rnd 23: (3 sc, sc inc) x 6 times (30)
Rnd 24 - Rnd 25 (2 rnds): sc all around (30)
Rnd 26: (4 sc, sc inc) x 6 times (36)
Rnd 27 - Rnd 29 (3 rnds): sc all around (36)
Rnd 30: (4 sc, sc dec) x 6 times (30)
Rnd 31: (3 sc, sc dec) x 6 times (24)
Rnd 32: (2 sc, sc dec) x 6 times (18)
*Put in the stuffing
Rnd 33: (sc dec) x 6 times (9)
Rnd 34: (sc, sc dec) x 6 times (6)
Fasten off and sew the hole close
Hands
(Make 2)
Rnd 1: 5sc into magic ring (5)
Rnd 2: sc inc x 5 times (10)
Rnd 3: sc all around (10)
Rnd 4: (2 sc, sc3tog) x 2 times (6)
Rnd 5 - Rnd 6 (2 rnds): sc all around (6)
Fasten off, leaving a length of yarn for sewing
*Put stuffing into leg
Legs
(Make 2)
Rnd 1: 5sc into magic ring (5)
Rnd 2: sc inc x 5 times (10)
Rnd 3: sc all around (10)
Rnd 4: 3 sc, sc dec x 2 times, 3 sc (8)
Rnd 5: sc all around (8)
Rnd 6: (3 sc, sc inc) x 2 times (10)
Rnd 7 - Rnd 8 (2 rnds): sc all around (10)
Fasten off, leaving a length of yarn for sewing
*Put stuffing into leg
Assembly
Sew the hands to the body
Sew the legs to the body
Happy New Year!

Happy New Year! 2015 had really gone by in a flash for me! Had lots of wonderful support from a lot of people for my amigurumis and I am really grateful for it :)
Hope to create more designs in 2016 and catch up with my long queue of patterns that I want to write. Also hope to be able to start my amigurumi workshops this year :) Looking forward to the new year!
Cute Version of Singapore's Merlion for 2nd World Amigurumi Exhibition
I am participating in this year's World Amigurumi Exhibition too.
World Amigurumi Exhibition vol. 2: Crocheted Culture Celebration! will be held from 11 Dec 2015 - 29 Feb 2016 at Resobox in New York. Each contributing artist is required to submit a piece representing their country and so there will be over 100 cultural pieces from 46 countries :)

World Amigurumi Exhibition vol. 2: Crocheted Culture Celebration! will be held from 11 Dec 2015 - 29 Feb 2016 at Resobox in New York. Each contributing artist is required to submit a piece representing their country and so there will be over 100 cultural pieces from 46 countries :)
This is the piece I have come up with : cute version of Singapore's Merlion in Singapore Flag colors!

Do drop by the exhibition if you are in New York. Admission is free. Visit http://resobox.com/amigurumi-world-15/ for more information :)
Big and Mini Elephants
Have been trying out making mini amigurumis using lace yarn. Made a mini elephant not long ago :D


Mini elephant was sold to my friend at Public Garden last month. Hope to find time to make another one again :)
Kito the Fox
Finally finish making a fox I wanted to do for quite some time.

Spent quite some time figuring out the best way to make the cream chest area and am quite satisfied with how it turns out! :)
And I am finally on Handmade@Amazon! If you do not know yet, Amazon has opened a handmade section just last weekend :)
Need to spend the next 2 weeks working on amigurumis for the upcoming Public Garden market and amigurumi exhibition in New York!
Captain America Amigurumi Pattern (Free)
I received a pattern request for the Captain America I did recently. Finally managed to squeeze some time to write it out :)

This is a free pattern, please do not sell this pattern or claim it as your own. If you want to share this pattern, please link back to this page. If you are selling the finished dolls, please credit Snacksies Handicraft Corner for the pattern and The Geeky Hooker for the design.
Materials:
Using DK yarn with 4mm hook will produce a Captain America of about 12cm/ 4.7in tall.
All yarn threads are assumed to be of the same thickness unless stated.
Flesh colored yarn
Light Blue yarn
Red yarn
White Yarn
White yarn of about half thickness than the rest (for the small star on the shield)
White Embroidery Thread
Safety Eyes 9mm x2 (based on DK yarn, use a bigger size if using a thicker yarn)
Stuffing
Abbreviations:
sc - single crochet
sc inc - single crochet increase
sc dec - single crochet decrease
ss - slip stitch
ch - chain stitch
dc - double crochet
tr - treble crochet
Rnd - Round
Head & Body
Note: All rounds start with light blue yarn unless otherwise stated. There will be color changes in the middle of some rounds and these will be indicated in ().
Note 2: Due to the differences in the crochet hook and yarn used, you may need to make color changes between beige and light blue a stitch earlier or later than stated so that a straight line is formed for the edge of the face.
With light blue yarn,
Rnd 1: 7sc into magic ring (7)
Rnd 2: sc inc x 7 times (14)
Rnd 3: (sc, sc inc) x 7 times (21)
Rnd 4: (2 sc, sc inc) x 7 times (28)
Rnd 5: (3 sc, sc inc) x 7 times (35)
Rnd 6: (4 sc, sc inc) x 7 times (42)
Rnd 7: (5 sc, sc inc) x 7 times (49)
Rnd 8 - Rnd 11 (4 rnds): sc all around (49)
Rnd 12: 24 sc, (change beige) sc, (light blue) 24 sc (49)
Rnd 13: (5 sc, sc dec) x 2 times, (change beige) (5 sc, sc dec) x 3 times, (light blue) (5 sc, sc dec) x 2 times (42)
Rnd 14: (4 sc, sc dec) x 2 times, sc, (change beige) 3 sc, dec, (4 sc, sc dec) x 2 times, sc, (light blue) 3 sc, dec, 4 sc, sc dec (35)
Rnd 15: (3 sc, sc dec) x 2 times, sc, (change beige) 2 sc, dec, (3 sc, sc dec) x 2 times, sc, (light blue) 2 sc, dec, 3 sc, sc dec (28)
Rnd 16: sc dec all around (14)
*Insert eyes between Rnd 11-12, 8 stitches apart. Make sure the eyes are centralized above the face.
Rnd 17: sc inc all around (28)
Rnd 18: (3 sc, sc inc) x 7 times (35)
Rnd 19 - Rnd 24 (5 rnds): sc all around (35)
Rnd 25 - Rnd 26 (2 rnds): ((red yarn) 6 sc, (white yarn) 6 sc) x 2 times, (red yarn) 6 sc, (white yarn) 5 sc (35)
Rnd 27 - Rnd 29 (3 rnds): sc all around (35)
Rnd 30: (back loop only) (3 sc, sc dec) x 7 times (28)
Rnd 31: (2 sc, sc dec) x 7 times (21)
Rnd 32: (sc, sc dec) x 7 times (14)
Rnd 33: sc dec x 7 times (7)
Fasten off and sew the hole close
Wings on the head (make 2)
With white yarn,
Row 1: ch 6 (6)
Row 2: ss to 4th stitch, (tr, dc) in a stitch, dc
Fasten off, leaving a length of yarn for sewing
Star (make one with normal yarn, one with the thinner yarn)
With white yarn,
Rnd 1: 5sc into magic ring (5)
Rnd 2: (ch 2, ss into 2nd ch, sc into next stitch in magic ring) x 5 times (15)
Fasten off, leaving a length of yarn for sewing
Shield
With light blue yarn,
Rnd 1: 6sc into magic ring (6)
Rnd 2: sc inc x 6 times (12)
Change to red yarn,
Rnd 3: (sc, sc inc) x 6 times (18)
Change to White yarn,
Rnd 4: (2 sc, sc inc) x 6 times (24)
Change to red yarn,
Rnd 5: (3 sc, sc inc) x 6 times (30)
Fasten off, leaving a length of yarn for sewing
Assembly
Sew the wings to the head
Sew the big star to the chest
Sew the small star to middle of the shield
Sew the shield to side of body
Captain America and Princess Leia
My friend had requested me to make The Geeky Hooker's version of Princess Leia and Captain America he saw on http://www.boredpanda.com/crochet-pop-characters-monsters-geeky-hooker/
and I finally finished making them.

I have a request for the patterns and have gotten permission from the original designer to share them so I will be tidying up the patterns and sharing them soon! :)
and I finally finished making them.

I have a request for the patterns and have gotten permission from the original designer to share them so I will be tidying up the patterns and sharing them soon! :)
Snow White and Prince Amigurumi Pattern (Free)
After I published the seven dwarfs pattern sometime back, I have been receiving requests for Snow White and Prince pattern. I made slightly different design of Snow White and Prince so that the ones my friend got for her wedding will be unique :D Hope you enjoy this version!

This is a free pattern, please do not sell this pattern or claim it as your own. If you want to share this pattern, please link back to this page. If you are selling the finished dolls, please credit Snacksies Handicraft Corner for the patterns.
There will be 2 patterns on this page, one for Snow White and one for Prince.
Materials:
Using fingering yarn with 2.5mm hook will produce a Snow White of about 11cm/4.3in tall and Prince of about 12cm/ 4.7in tall. They will be slightly taller than the seven dwarfs if the same yarn thickness is used.
All yarn threads are assumed to be of the same thickness.
Flesh colored yarn
Yellow yarn
Blue yarn
Light Blue yarn
Red yarn
Brown yarn
Tan yarn
Black yarn
White Yarn
Red Embroidery Thread
Black Embroidery Thread
Safety Eyes 6mm x4 (based on fingering yarn, use a bigger size if using a thicker yarn)
Felting needle + pink felting wool OR pink felt and glue
Stuffing
Abbreviations:
sc - single crochet
sc inc - single crochet increase
sc dec - single crochet decrease
ss - slip stitch
ch - chain stitch
hdc - half double crochet
hdc inc - half double crochet increase
dc - double crochet
bo - bobble stitch with 3 double crochet
Rnd - Round
Pattern for Snow White
Head
With flesh colored yarn,
Rnd 1: 6sc into magic ring (6)
Rnd 2: sc inc x 6 times (12)
Rnd 3: (sc, sc inc) x 6 times (18)
Rnd 4: (2 sc, sc inc) x 6 times (24)
Rnd 5: (3 sc, sc inc) x 6 times (30)
Rnd 6: (4 sc, sc inc) x 6 times (36)
Rnd 7: (5 sc, sc inc) x 6 times (42)
Rnd 8 - Rnd 14 (7 rnds): sc all around (42)
Rnd 15: (5 sc, sc dec) x 6 times (36)
Rnd 16: (4 sc, sc dec) x 6 times (30)
Rnd 17: (3 sc, sc dec) x 6 times (24)
Rnd 18: (2 sc, sc dec) x 6 times (18)
Rnd 19: (4 sc, sc dec) x 3 times (15)
Rnd 20: sc all around (15)
Fasten off
Insert the eyes between Rnd 11 - Rnd 12, about 6 stitches apart.
Sew the mouth at Rnd 13
Put stuffing in
Body
Attach blue yarn to head,
Rnd 1: (4 sc, sc inc) x 3 times (18)
Rnd 2: (5 sc, sc inc) x 3 times (21)
Rnd 3 - Rnd 7 (5 rnds): sc all around (21)
Change to yellow yarn,
Rnd 8: (back loop only) sc all around (21)
Rnd 9 - Rnd 13 (5 rnds): sc all around (21)
Rnd 14: (6 sc, sc inc) x 3 times (24)
Rnd 15: sc all around (24)
Rnd 16: (7 sc, sc inc) x 3 times (27)
Rnd 17: sc all around (27)
Rnd 18: (8 sc, sc inc) x 3 times (30)
Rnd 19: (back loop only) (3 sc, sc dec) x 6 times (24)
Rnd 20: (2 sc, sc dec) x 6 times (18)
*stuff
Rnd 21: sc dec x 9 times (9)
Rnd 22: (sc, sc dec) x 3 times (6)
Fasten off and sew the hole close.
Skirt
Attach yellow yarn to the front loops of Rnd 8
Rnd 1: sc all around (21)
Rnd 2: hdc inc x 21 times (42)
Rnd 3: hdc all around (42)
Rnd 4: (2 hdc, hdc inc) x 14 times (56)
Rnd 5 - Rnd 7 (3 rnds): hdc all around (56)
Rnd 8: (13 hdc, hdc inc) x 4 times (60)
Rnd 9: hdc all around (60)
Hair
(Note: from Rnd 13 onwards, the ch stitches at end of the rnd/row is not included in the stitch counts)
With black yarn,
Rnd 1: 6sc into magic ring (6)
Rnd 2: sc inc x 6 times (12)
Rnd 3: (sc, sc inc) x 6 times (18)
Rnd 4: (2 sc, sc inc) x 6 times (24)
Rnd 5: (3 sc, sc inc) x 6 times (30)
Rnd 6: (4 sc, sc inc) x 6 times (36)
Rnd 7: (5 sc, sc inc) x 6 times (42)
Rnd 8 - Rnd 12 (5 rnds): sc all around (42)
Rnd 13: sc all around, 2 ch, turn (42)
(Now crocheting in rows)
Row 14: (bo, 2 sc) x 7 times, bo, ch, turn (22)
Row 15: sc dec, 18 sc, sc dec, ch, turn (20)
Row 16: (bo, 2 sc) x 6 times, bo, sc (20)
Fasten off
Hair Fringe
There will be 20 stitches of Rnd 13 left. Find the middle 18 stitches for the fringe.
Attach black yarn,
Row 1: ss, sc, 3 hdc, dc, hdc, sc, 2 ss, sc, hdc, dc, 3 hdc, sc, ss (18)
Fasten off, leaving a length of yarn for sewing
Hands (make 2)
With flesh colored yarn,
Rnd 1: 5sc into magic ring (5)
Rnd 2 - Rnd 6 (5 rnds): sc all around (5)
Change to light blue yarn,
Rnd 7: 2 sc, sc inc, 2 sc (6)
Rnd 8: (2 sc, sc inc) x 2 times (8)
Rnd 9: sc all around (8)
Rnd 10: (2 sc, sc dec) x 2 times (6)
Fasten off, leaving a length of yarn for sewing.
Stuff.
Sew the hole close. Do not cut the yarn yet as it will be used for sewing onto the body later.
Ribbon
With red yarn,
Row 1: Ch 17 (17)
Row 2: sc from 2nd stitch until the end, ch, turn (16)
Row 3: (2 sc, hdc, 2 dc, hdc, 2 sc) x 2 times (16)
Fasten off, leaving a length of yarn for sewing.
Fold the 2 ends of the ribbon to the middle and sew them together. Wrap red yarn around the middle tightly to make the ribbon shape.
Assembly for Snow White
Sew the hands to the body.
Sew the hair to the head.
Sew the ribbon to the hair.
Felt the felting wool or glue the felt to make the cheeks
Pattern for Prince
Head
With flesh colored yarn,
Rnd 1: 6sc into magic ring (6)
Rnd 2: sc inc x 6 times (12)
Rnd 3: (sc, sc inc) x 6 times (18)
Rnd 4: (2 sc, sc inc) x 6 times (24)
Rnd 5: (3 sc, sc inc) x 6 times (30)
Rnd 6: (4 sc, sc inc) x 6 times (36)
Rnd 7: (5 sc, sc inc) x 6 times (42)
Rnd 8: (6 sc, sc inc) x 6 times (48)
Rnd 9 - Rnd 15 (7 rnds): sc all around (48)
Rnd 16: (6 sc, sc dec) x 6 times (42)
Rnd 15: (5 sc, sc dec) x 6 times (36)
Rnd 16: (4 sc, sc dec) x 6 times (30)
Rnd 17: (3 sc, sc dec) x 6 times (24)
Rnd 18: (2 sc, sc dec) x 6 times (18)
Rnd 19: (4 sc, sc dec) x 2 times (15)
Fasten off
Insert the eyes between Rnd 12 - Rnd 13, about 7 stitches apart.
Sew the mouth at Rnd 14
Put stuffing in
Body
Attach blue yarn to head,
Rnd 1: (4 sc, sc inc) x 3 times (18)
Rnd 2 - Rnd 3 (2 rnds): sc all around (18)
Rnd 4: (2 sc, sc inc) x 6 times (24)
Rnd 5 - Rnd 8 (4 rnds): sc all around (24)
Change to light blue yarn,
Rnd 9: (back loop only) sc all around (24)
Rnd 10 - Rnd 11 (2 rnds): sc all around (24)
Put stuffing in
Remove or add a few sc until you reach the middle of the back or front of the body. Ch 3, ss to 12th stitch. This should split the body into 2 parts. These 2 parts will be the legs and you will be crocheting a circle on each part to make the legs. Make sure that the body is divided into 2 parts in the middle of the body.

Leg (to be done on each part, the first leg can be continued above. For the 2nd leg, attach yarn to Rnd 8 above)
Rnd 1 - Rnd 2 (2 rnds): 15 sc, including the chain stitches (15)
Rnd 3: (3 sc, sc dec) x 3 times (12)
Rnd 4: sc all around (12)
Rnd 3: (4 sc, sc dec) x 3 times (9)
Fasten off and stuff
Body continued (to make the part of the top below the belt)
Locate the middle 12 front loops of Rnd 9 on the front of the body. The start and end should be at the sides of the body.
Attach blue yarn to the front loops,
Row 1: 12 sc, ch, turn (12)
Row 2: sc dec, 8 sc, sc dec, ch, turn (10)
Row 3: sc dec, 6 sc, sc dec, ch, turn (8)
Row 3, sc all the way (8)
Repeat for the back of the body.
Hair
With brown yarn,
Rnd 1: 6sc into magic ring (6)
Rnd 2: sc inc x 6 times (12)
Rnd 3: (sc, sc inc) x 6 times (18)
Rnd 4: (2 sc, sc inc) x 6 times (24)
Rnd 5: (3 sc, sc inc) x 6 times (30)
Rnd 6: (4 sc, sc inc) x 6 times (36)
Rnd 7: (5 sc, sc inc) x 6 times (42)
Rnd 8: (6 sc, sc inc) x 6 times (48)
Rnd 9 - Rnd 16 (8 rnds): sc all around (48)
Row 10: sc, hdc, 2 dc, 2 ss, 7 dc, hdc, sc, 2 ss, sc, hdc, sc, ss (21)
Fasten off, leaving a length of yarn for sewing
Hands (make 2)
With flesh colored yarn,
Rnd 1: 7sc into magic ring (7)
Rnd 2: sc all around (7)
Rnd 3: sc, sc dec, sc, sc dec, sc (5)
Change to white yarn,
Rnd 4: sc inc x 5 times (10)
Rnd 5 - Rnd 11 (7 rnds): sc all around (10)
Rnd 12: sc dec, sc, sc dec, sc, sc dec x 2 times (6)
Fasten off, leaving a length of yarn for sewing.
Stuff.
Shoes (make 2)
(Note: base of shoe is done in oval rounds)
With tan yarn,
ch 3 (3)
Rnd 1: skip first chain, 5 sc in 1 stitch, 3 sc in 1 stitch (8)
Rnd 2: sc inc x 5 times, sc inc x 3 times (16)
Rnd 3: (back loop only) sc all around (16)
Rnd 4: sc, sc dec x 4 times, 7 sc (12)
Rnd 5: sc, sc dec x 2 times, 7 sc (10)
Rnd 6 - Rnd 7 (2 rnds): sc all around (10)
Fasten off, leaving a length of yarn for sewing
Attach tan yarn to front loops of Rnd 3,
Rnd 1: ss all around (16)
Fasten off.
Put stuffing in
Belt
With tan yarn, surface crochet around the waist
Details on top
With yellow yarn, ss all around the bottom of the top to form the yellow border
Assembly
Sew the hands to the body
Sew the shoes to the legs
Sew the hair to the head
Felt the felting wool or glue the felt to make the cheeks
Hope you enjoy the pattern!
Bride and Groom Amigurumi Pattern
Finally finished the bride and groom amigurumi pattern! Took me really a long time as it is a long and detailed pattern with 28 pages and 71 photos. Glad that it is finally done :) The pattern can be found here.

Hope to work out a free pattern of Snow White and Prince next. A few people had requested me for it a while back. Hope to get it out soon :)

Hope to work out a free pattern of Snow White and Prince next. A few people had requested me for it a while back. Hope to get it out soon :)
Mini Dog Amigurumi
Inspired by a fellow amigurumist and decided to try making a mini amigurumi using lace yarn.

The dog is only about 3cm/ 1 inch tall! This is the smallest amigurumi I have made to date :D
Check out the instagram of the amigurumist who inspired me! His amigurumis are way smaller than this and always amaze me.

The dog is only about 3cm/ 1 inch tall! This is the smallest amigurumi I have made to date :D
Check out the instagram of the amigurumist who inspired me! His amigurumis are way smaller than this and always amaze me.


