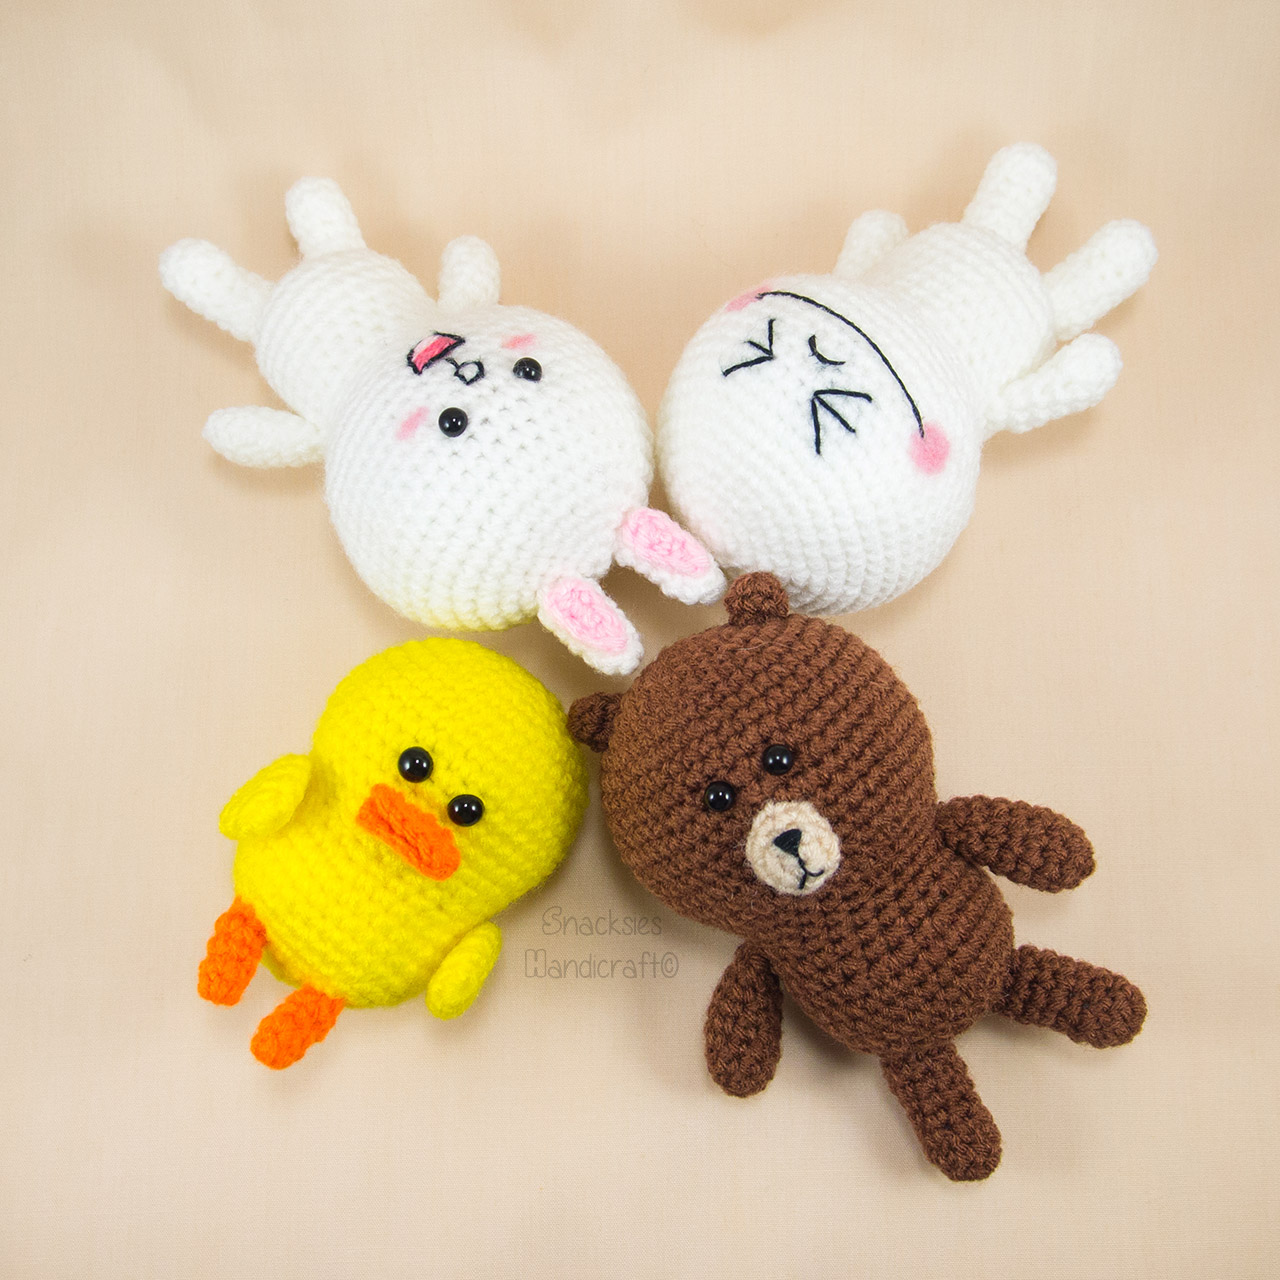
Octopus Amigurumi

Designed a new octopus amigurumi recently


I have already created a listing for a made-to-order for a couple. Hope to get the pattern up soon!


And the World Amigurumi Exhibition at Resobox in New York has already started! It will be there until 28th Feb. The organizer shared a photo with us:


Really wished I could be there! :(

Small Dog Amigurumi and Updates

Made a small dog amigurumi for a friend's request :)


Also I will be joining MAAD (Market of Artists and Designers) on 12th Dec! It will be at Red Dot Museum from 5pm to midnight. This is the first time I am setting up a booth for my crafts, feeling nervous and excited at the same time :D Need to quickly do more amigurumis now :D

World Amigurumi Exhibition Preparation

Busy with preparing for World Amigurumi Exhibition recently. I have registered myself and will be sending over a few pieces!


Made 4 pieces so far, hope to make a few more :) Since New York is very far from Singapore, I will need to send them latest by Monday. Hope to finish what I planned in time!

Christmas Set Patterns

Had a really busy week as my computer hard disk crashed and I have to set up all the programs again in order to do my patterns. :/

Luckily I still managed to finish all the Christmas patterns! They are available for sale as a set (10% discount) or individually. Do take a look if you want to make your own Christmas toys and ornaments!


Ginger the Gingerbread Man Hand Carved Stamp and Amigurumi Pattern

Attended a stamp carving workshop about a month+ back and it was really fun! Had been practicing my skills recently and managed to make a decent look gingerbread man stamp... hehe.. it is really not easy to make the stamp neat


I have put it up as a Etsy listing here. Hope to make stamps for all my designed amigurumi characters! :)

I have also finally finished Ginger's pattern. Hope to finish the other Christmas Set patterns soon!

LINE Cony Crochet Amigurumi Pattern (Free)

Finally found time to write out the pattern. Sorry for the delay!

crocheted-line-cony-amigurumi

This is a free pattern, please do not sell this pattern or claim it as your own. If you want to share this pattern, please link back to this page. If you are selling the finished doll, please credit Snacksies Handicraft Corner for the design.

Materials:

Using fingering yarn with 2.5mm hook will produce a Cony of about 12.5cm/4.9in tall (including ears).

All yarn threads are assumed to be of the same thickness.
White yarn
Pink yarn
Black embroidery thread
Dark Pink embroidery thread
Light Pink embroidery thread
Safety Eyes 5mm x2 (based on fingering yarn, use a bigger size if using a thicker yarn)
Felting needle + pink felting wool OR pink felt and glue
Stuffing

Abbreviations:
sc - single crochet
sc inc - single crochet increase
sc dec - single crochet decrease
ch - chain
sc3tog - single crochet 3 together

Head & Body
With white yarn,
Rnd 1: 6sc into magic ring    (6)
Rnd 2: sc inc x 6 times    (12)
Rnd 3: (sc, sc inc) x 6 times    (18)
Rnd 4: (2 sc, sc inc) x 6 times    (24)
Rnd 5: (3 sc, sc inc) x 6 times    (30)
Rnd 6: (4 sc, sc inc) x 6 times    (36)
Rnd 7: (5 sc, sc inc) x 6 times    (42)
Rnd 8: (6 sc, sc inc) x 6 times    (48)
Rnd 9 - Rnd 10 (2 rnds): sc all around    (48)
Rnd 11: (7 sc, sc inc) x 6 times    (54)
Rnd 12: (8 sc, sc inc) x 6 times    (60)
Rnd 13: (8 sc, sc dec) x 6 times    (54)
Rnd 14: (7 sc, sc dec) x 6 times    (48)
Rnd 15 - Rnd 16 (2 rnds): sc all around    (48)
Rnd 17: (6 sc, sc dec) x 6 times    (42)
Rnd 18: (5 sc, sc dec) x 6 times    (36)
Rnd 19: (4 sc, sc dec) x 6 times    (30)
Rnd 20: (3 sc, sc dec) x 6 times    (24)
Rnd 21: (4 sc, sc dec) x 4 times    (20)
Rnd 22: 4 sc, (sc, sc inc) x 3 times, 4 sc, (sc, sc inc) x 3 times   (26)
Rnd 23 - Rnd 24 (2 rnds): sc all around    (26)
Rnd 25: 13 sc, (sc, sc inc) x 3 times, 7 sc   (29)
Rnd 26 - Rnd 28 (3 rnds): sc all around    (29)
Rnd 29: 13 sc, (sc, sc dec) x 3 times, 7 sc   (26)
Rnd 30: 4 sc, (sc, sc dec) x 3 times, 4 sc, (sc, sc dec) x 3 times   (20)

*Locate the front of Cony by turning the crocheted piece around and finding a slight protruding point on the body. This protruding point is the tummy.

crocheted-line-cony-amigurumi-tummy-anno


*Insert the eyes on the face between Rnd 11 - Rnd 12, about 3 stitches apart.
*With black embroidery thread, sew the nose on Rnd 13.
*With black, dark pink and light pink embroidery thread, sew the mouth between Rnd 15-17

*Put in the stuffing
Rnd 31: sc dec x 10 times     (10)
Rnd 32: sc dec x 5 times     (5)
Fasten off and sew the hole close

Hands
(Make 2)
With white yarn,
Rnd 1: 4sc into magic ring    (4)
Rnd 2: (sc, sc inc) x 2 times    (6)
Rnd 3 - Rnd 7 (5 rnds): sc all around    (6)
Fasten off, leaving a length of yarn for sewing
*Put stuffing into hand

Legs
(Make 2)
With white yarn,
Rnd 1: 6sc into magic ring    (6)
Rnd 2: (sc, sc inc) x 3 times    (9)
Rnd 3: sc all around    (9)
Rnd 4: 3 sc, sc3tog, 3 sc   (7)
Rnd 5: sc all around    (7)
Rnd 6: (2 sc, sc inc) x 2 times, sc    (9)
Rnd 7: sc all around    (9)
Fasten off, leaving a length of yarn for sewing
*Put stuffing into leg

Tail
With white yarn,
Rnd 1: 5sc into magic ring   (5)
Rnd 2: sc all around    (5)
Fasten off, leaving a length of yarn for sewing

Ears (white portion)
(Make 2)
With white yarn,
Rnd 1: 4sc into magic ring   (4)
Rnd 2: (sc, sc inc) x 2 times    (6)
Rnd 3 - Rnd 6 (4 rnds): sc all around    (6)
Fasten off, leaving a length of yarn for sewing

Ears (pink portion)
(Make 2)
With pink yarn,
Row 1: ch 5   (5)
Row 2: sc from 2nd stitch until the end    (4)
Fasten off, leaving a length of yarn for sewing

Assembly
Sew the pink portion of the ear to the white portion

Flatten the ears and sew to the head

Sew the hands to the body

Sew the legs to the body

Sew the tail to the back of the body

Felt the felting wool or glue the felt at around rnd 13 to make the cheeks.


Hope you enjoyed the pattern! You are welcome to share a picture of your completed Cony with me :D

Custom Order - Girl with Plaits in Purple Dress

Finished a custom order of one of my previous designs. Added a bag with the owner's name and a smile and blushes :)

crocheted-girl-with-plaits-amigurumi

If you want to own 1 too, Etsy listing is available with customizable hair color and dress color.

Hehe going to make a boy to couple with her soon!

Line Brown Crochet Amigurumi Pattern (Free)

Finally found time to share out my LINE Brown pattern!


This is a free pattern, please do not sell this pattern or claim it as your own. If you want to share this pattern, please link back to this page. If you are selling the finished doll, please credit Snacksies Handicraft Corner for the design.

Materials:

Using fingering yarn with 2.5mm hook will produce a Sally of about 12cm/4.7in tall.

All yarn threads are assumed to be of the same thickness.
Brown yarn
Beige yarn
Black embroidery thread
Safety Eyes 5mm x2 (based on fingering yarn, use a bigger size if using a thicker yarn)
Stuffing

Abbreviations:
sc - single crochet
sc inc - single crochet increase
sc dec - single crochet decrease

Mouth/Nose Area
With beige yarn,
Rnd 1: 5sc into magic ring    (5)
Rnd 2: sc inc x 5 times    (10)
Rnd 3: sc all around    (10)
Fastern off, leaving a length of yarn for sewing

With black embroidery thread, sew the nose and mouth

Head & Body
With brown yarn,
Rnd 1: 6sc into magic ring    (6)
Rnd 2: sc inc x 6 times    (12)
Rnd 3: (sc, sc inc) x 6 times    (18)
Rnd 4: (2 sc, sc inc) x 6 times    (24)
Rnd 5: (3 sc, sc inc) x 6 times    (30)
Rnd 6: (4 sc, sc inc) x 6 times    (36)
Rnd 7: (5 sc, sc inc) x 6 times    (42)
Rnd 8: (6 sc, sc inc) x 6 times    (48)
Rnd 9 - Rnd 10 (2 rnds): sc all around    (48)
Rnd 11: (7 sc, sc inc) x 6 times    (54)
Rnd 12: (8 sc, sc inc) x 6 times    (60)
Rnd 13: (8 sc, sc dec) x 6 times    (54)
Rnd 14: (7 sc, sc dec) x 6 times    (48)
Rnd 15 - Rnd 16 (2 rnds): sc all around    (48)
Rnd 17: (6 sc, sc dec) x 6 times    (42)
Rnd 18: (5 sc, sc dec) x 6 times    (36)
Rnd 19: (4 sc, sc dec) x 6 times    (30)
Rnd 20: (3 sc, sc dec) x 6 times    (24)
Rnd 21: 6 sc, (sc, sc inc) x 3 times, 6 sc, (sc, sc inc) x 3 times   (30)
Rnd 22 - Rnd 23 (2 rnds): sc all around    (30)
Rnd 24: 15 sc, (sc, sc inc) x 3 times, 9 sc   (33)
Rnd 25 - Rnd 27 (3 rnds): sc all around    (33)
Rnd 28: 15 sc, (sc, sc dec) x 3 times, 9 sc   (30)
Rnd 29: 6 sc, (sc, sc dec) x 3 times, 6 sc, (sc, sc dec) x 3 times   (24)

*Locate the front of Brown by turning the crocheted piece around and finding a slight protruding point on the body. This protruding point is the tummy.


*Insert the eyes on the face between Rnd 11 - Rnd 12, about 2 stitches apart.
*Sew the nose/ mouth area between Rnd 13 - Rnd 17.

Rnd 30: (sc dec, 2 sc) x 6 times    (18)
*Put in the stuffing
Rnd 31: (sc dec) x 6 times     (9)
Rnd 32: (sc dec, sc) x 6 times     (6)
Fasten off and sew the hole close

Hands
(Make 2)
Rnd 1: 6sc into magic ring    (6)
Rnd 2: (sc, sc inc) x 3 times    (9)
Rnd 3 - Rnd 8 (6 rnds): sc all around    (9)
Fastern off, leaving a length of yarn for sewing
*Put stuffing into hand

Legs
(Make 2)
Rnd 1: 5sc into magic ring    (5)
Rnd 2: sc inc x 5 times    (10)
Rnd 3: sc all around    (10)
Rnd 4: 3 sc, sc dec x 2 times, 3 sc   (8)
Rnd 5: sc all around    (8)
Rnd 6: (3 sc, sc inc) x 2 times    (10)
Rnd 7 - Rnd 8 (2 rnds): sc all around    (10)
Fastern off, leaving a length of yarn for sewing
*Put stuffing into leg

Tail
With brown yarn,
Rnd 1: 5sc into magic ring   (5)
Rnd 2: sc all around    (5)
Fastern off, leaving a length of yarn for sewing

Ears
(Make 2)
With brown yarn,
Rnd 1: 5sc into magic ring   (5)
Rnd 2: sc all around    (5)
Fastern off, leaving a length of yarn for sewing

Assembly
Flatten the ears and sew to the head

Sew the hands to the body

Sew the legs to the body

Sew the tail to the back of the body


Hope you enjoyed the pattern! Feel free to share a picture of your Brown!

Halloween Set Patterns and Made-to-order

Finally finished writing all the patterns for the Halloween set. Took me longer than expected :/ The patterns and made-to-order listings are up on Etsy shop.


Next in line will be putting up free LINE Brown pattern as promised to one of my Instagram followers. Hope it will not take too long!

Line Sally Crochet Amigurumi Pattern (Free)

Sharing out my LINE Sally pattern today. Enjoy!


This is a free pattern, please do not sell this pattern or claim it as your own. If you want to share this pattern, please link back to this page. If you are selling the finished doll, please credit Snacksies Handicraft Corner for the design.

Materials:

Using fingering yarn with 2.5mm hook will produce a Sally of about 8cm/3.1in tall.

All yarn threads are assumed to be of the same thickness.
Yellow yarn
Orange yarn
Safety Eyes 6mm x2 (based on fingering yarn, use a bigger size if using a thicker yarn)
Stuffing

Abbreviations:
sc - single crochet
sc inc - single crochet increase
sc dec - single crochet decrease

Mouth
With orange yarn,
Row 1: ch 12    (12)
Row 2: sc from 2nd stitch until end    (11)
Fastern off, leaving a length of yarn for sewing

Head & Body
With yellow yarn,
Rnd 1: 6sc into magic ring    (6)
Rnd 2: sc inc x 6 times    (12)
Rnd 3: (sc inc, sc) x 6 times    (18)
Rnd 4: (sc inc, 2 sc) x 6 times    (24)
Rnd 5: (sc inc, 3 sc) x 6 times    (30)
Rnd 6: (sc inc, 4 sc) x 6 times    (36)
Rnd 7: (sc inc, 5 sc) x 6 times    (42)
Rnd 8 - Rnd 13 (6 rnds): sc all around    (42)
Rnd 14: (sc dec, 5 sc) x 6 times    (36)
Rnd 15: (sc dec, 4 sc) x 6 times    (30)
Rnd 16: (sc dec, 3 sc) x 6 times    (24)
Rnd 17: (sc inc, 3 sc) x 6 times    (30)
Rnd 18: (sc inc, 4 sc) x 6 times    (36)
Rnd 19: sc all around    (36)
Rnd 20: 6sc, (sc inc, sc) x 6 times, 18sc    (42)
Rnd 21: sc all around    (42)
Rnd 22: (sc dec, 5 sc) x 6 times    (36)
Rnd 23: (sc dec, 4 sc) x 6 times    (30)
Rnd 24: (sc dec, 3 sc) x 6 times    (24)

*Locate the back of Sally by turning the crocheted piece around and finding a slight protruding point on the body. This protruding point is the tail. The opposite end on the head will be the face of Sally.

*Insert the eyes on the face between Rnd 10 - Rnd 11, about 1 stitch apart.
*Fold the mouth into half and sew it between Rnd 13 - Rnd 14. Note that the folded part should be on your right when Sally is facing you.

Rnd 25: (sc dec, 2 sc) x 6 times    (18)
*Put in the stuffing
Rnd 26: (sc dec, sc) x 6 times     (12)
Rnd 27: (sc dec) x 6 times     (6)
Fasten off and sew the hole close

Legs
(Make 2)
With orange yarn,
Rnd 1: 5sc into magic ring   (5)
Rnd 2 - Rnd 4 (3 rnds): sc all around    (5)
Fastern off, leaving a length of yarn for sewing

Wings
(Make 2)
With yellow yarn,
Rnd 1: 5sc into magic ring   (5)
Rnd 2: sc, sc inc x 3 times, sc   (8)
Rnd 3: sc, (sc inc, sc) x 3 times, sc    (11)
Rnd 4: sc all around    (11)
Rnd 5: sc, (sc dec, sc) x 3 times, sc    (8)
Rnd 6: sc, (sc dec) x 6 times, sc    (5)
Fastern off, leaving a length of yarn for sewing

Assembly
Sew the wings to the body at around Rnd 17 - Rnd 18

Sew the legs to the body between Rnd 24 - Rnd 26


Hope you enjoyed the pattern! Feel free to share a picture of your Sally!

Halloween Set

Finished making a Halloween set recently. There are 5 characters in the set: Boo the Ghost, Flo the witch, Mr K the vampire, Pumpkin the cat and Frankenstein.


crocheted-halloween-amigurumi

crocheted-halloween-ghost-amigurumi
Boo the Ghost


crocheted-witch-amigurumi
Flo the Witch
crocheted-vampire-amigurumi
Mr K the vampire
crocheted-halloween-cat-amigurumi
Pumpkin the cat
crocheted-halloween-frankenstein-amigurumi
Frankenstein
Boo the ghost pattern is already out in Etsy. Will be putting up the patterns for the rest soon!

Kiwatarou (極太郎) Crochet Pattern (Free)

Sharing out the pattern for making Kiwatarou (極太郎). Kiwatarou is a character designed by Tsukasa of a Japanese band called despairsray. Enjoy the pattern!

crocheted Kiwatarou (極太郎) amigurumi pattern


This is a free pattern. Please do not take it and sell it elsewhere. Thanks!

Materials:
All yarn threads are assumed to be of the same thickness.
Brown yarn
White yarn
Black yarn
Red yarn
Yellow yarn
Stuffing
Crochet Hook

Abbreviations:
sc - single crochet
sc inc - single crochet increase
sc dec - single crochet decrease
ss - slip stitch
ch - chain
dc - double crochet
dc dec - double crochet decrease
dc inc - double crochet increase
Rnd - round
half-rnd - half-round, like a semi-circle

Head
With brown yarn,
Rnd 1: 6sc into magic ring    (6)
Rnd 2: sc inc x 6 times    (12)
Rnd 3: (sc inc, sc) x 6 times    (18)
Rnd 4: (sc inc, 2 sc) x 6 times    (24)
Rnd 5: (sc inc, 3 sc) x 6 times    (30)
Rnd 6: (sc inc, 4 sc) x 6 times    (36)
Rnd 7: (sc inc, 5 sc) x 6 times    (42)
Rnd 8: (sc inc, 6 sc) x 6 times    (48)
Rnd 9: (sc inc, 7 sc) x 6 times    (54)
Rnd 10 - Rnd 17 (8 rnds): sc all around    (54)
Rnd 18: (sc dec, 7 sc) x 6 times    (48)
Rnd 19: (sc dec, 6 sc) x 6 times    (42)
Rnd 20: (sc dec, 5 sc) x 6 times    (36)
Rnd 21: (sc dec, 4 sc) x 6 times    (30)
Rnd 22: (sc dec, 3 sc) x 6 times    (24)
Fastern off

Nose
White part of nose area
With white yarn,
ch 4, turn    (4)
Rnd 1: starting from 2nd stitch, 3 sc in 1 stitch, sc, 3 sc in 1 stitch, (now working on opposite side of ch) sc    (8)
Rnd 2: sc inc x 3 times, sc, sc inc x 3 times, sc   (14)
Rnd 3: (sc, sc inc) x 3 times, sc, (sc, sc inc) x 3 times, sc   (20)
Rnd 4: (2 sc, sc inc) x 3 times, sc, (2 sc, sc inc) x 3 times, sc   (26)
Rnd 5: sc all around    (26)
Fastern off and leave a length of yarn for sewing

Black part of nose area
With black yarn,
Rnd 1: 5sc into magic ring    (5)
Fastern off and leave a length of yarn for sewing

Sew the black part of the nose into a ball and sew it to the white part of the nose between rnd 4-5.
Sew the black dots on the white part of the nose

Tongue
With red yarn,
chain 3, turn    (3)
Rnd 1: starting from 2nd stitch, sc, 3 sc in 1 stitch, (now working on opposite side of ch) sc    (5)
Fastern off and leave a length of yarn for sewing

Sew the tongue to the nose

Eyes
(Make 2)
With black yarn,
chain 2, turn, and sc on 2nd stitch
Fastern off and leave a length of yarn for sewing

Assembling the head
Put stuffing and sew the nose to the head from Rnd 15 onwards. After securing the nose area, do not weave in and cut off the white yarn yet.
Sew the eyes between Rnd 15 - Rnd 16 about 6 stitches apart. After sewing the eyes, use the white yarn from the nose to sew a white dot in the middle of the 2 eyes. You can weave in the white yarn and cut off here.
Sew eyebrows at Rnd 7 - Rnd 8

Body
Attach the white yarn to around the middle of back of head,
Rnd 1: sc all around    (24)
Rnd 2: (sc inc, 3 sc) x 6 times    (30)
Rnd 3: (sc inc, 4 sc) x 6 times    (36)
Rnd 4: (sc inc, 5 sc) x 6 times    (42)
Rnd 5 - Rnd 7 (3 rnds): sc all around    (42)
Rnd 8: (sc inc, 6 sc) x 6 times    (48)
Rnd 9: (sc dec, 4 sc) x 8 times    (40)
Rnd 10: (sc dec, 2 sc) x 10 times    (30)
sc until the stitch is around the middle of the back of head
Rnd 11: 3 sc, (sc dec, sc) x 3 times, 6 sc, (sc dec, sc) x 3 times, 3 sc   (24)
Rnd 12: 3 sc, sc dec x 3 times, 6 sc, sc dec x 3 times, 3 sc   (18)
Rnd 13: sc all around    (18)
Rnd 14: (sc dec, sc) x 6 times    (12)
*Put in stuffing
Rnd 15: sc dec x 6 times    (6)
Fastern off and sew the hole close

Hands
(Make 2)
With brown yarn,
Rnd 1: 6sc into magic ring    (6)
Rnd 2 - Rnd 5 (4 rnds): sc all around    (6)
Fastern off and leave a length of yarn for sewing

Legs
(Make 2)
With brown yarn,
Rnd 1: 6sc into magic ring    (6)
Rnd 2: sc inc x 6 times    (12)
Rnd 3: 4 sc, dec x 2 times, 4 sc    (10)
Rnd 4 - Rnd 5 (2 rnds): sc all around    (10)
Fastern off and leave a length of yarn for sewing

Put stuffing into hands and sew to body
Put stuffing into legs and sew to body

Tail
Rnd 1: 5sc into magic ring    (5)
Rnd 2: sc inc x 5 times    (10)
Rnd 3: (sc inc, sc) x 5 times    (15)
Rnd 4: sc all around    (15)
Rnd 5: (sc dec, sc) x 5 times    (10)

Put stuffing in the tail and sew it to the butt

Red cape
Note: this is at the back of the body inside the black cape so it will not be visible if the black cape is worn
With red yarn,
Row 1: (Leave a length of yarn in front for sewing) ch 20, turn    (20)
*Note: for the following rows, the stitch count does NOT include the ch stitch at the end and the ch stitch should be skipped when doing the next row
Row 2: sc from 2nd stitch until the end, ch 1, turn    (19)
Row 3: dec x 2 times, 11 sc, dec x 2 times, ch 1, turn    (15)
Row 4: dec x 2 times, 7 sc, dec x 2 times, ch 1, turn    (11)
Row 5: sc until the end, ch 1, turn    (11)
Row 6: inc, 9 sc, inc, ch 1, turn    (13)
Row 7: sc until the end, ch 1, turn    (13)
Row 8: sc until the end, ch 1, turn    (13)
Row 9: inc, 11 sc, inc, ch 1, turn    (15)
Row 10: sc until the end, ch 1, turn    (15)
Row 11: sc until the end, ch 1, turn    (15)
Row 12: inc, 13 sc, inc, ch 1, turn    (17)
Row 10: sc until the end, ch 1, turn    (17)
Row 11: sc until the end    (17)
Faster off

Sew the red cape to the back

Black cape
Hood
With black yarn,
ch 18, turn    (18)
*Note: for the following half-rnds, the stitch count does NOT include the ch stitch at the end and the ch stitch should be skipped when doing the next row
Half-rnd 1: starting from 2nd stitch, 16 sc, 3 sc in 1 stitch, (now working on opposite side of ch) 16 sc, ch, turn    (35)
Half-rnd 2: 16 sc, sc inc x 3 times, 16 sc, ch, turn   (38)
Half-rnd 3: 16 sc, (sc, sc inc) x 3 times, 16 sc, ch, turn   (41)
Half-rnd 4: 16 sc, (2 sc, sc inc) x 3 times, 16 sc, ch, turn   (44)
Half-rnd 5: 16 sc, (3 sc, sc inc) x 3 times, 16 sc, ch, turn   (47)
Half-rnd 6: 16 sc, (4 sc, sc inc) x 3 times, 16 sc, ch, turn   (50)
Half-rnd7: 16 sc, (5 sc, sc inc) x 3 times, 16 sc, ch, turn   (53)
Half-rnd 8 - Half-rnd 20 (13 half-rounds): sc all around, ch, turn    (53)
Half-rnd 21: sc all around (53)
Fastern off

Bottom of Cape
With black yarn,
*Note: for the following half-rnds, the stitch count does NOT include the ch stitches at the end and the ch stitch should be skipped when doing the next row
Row 1: Attach to bottom of the hood, 43 sc, 2 ch, turn    (43)
Row 2: dc dec x 20 times, sc, dc dec, 2 ch, turn    (22)
Row 3: dc dec x 11 times, 2 ch, turn    (11)
Row 4: dc inc x 11 times, 2 ch, turn    (22)
Row 5: (4 dc, dc inc) x 2 times, 2 dc,  (4 dc, dc inc) x 2 times, 2 ch, turn   (26)
Row 6 - Row 9 (4 rows): dc until the end, 2 ch, turn   (26)
Row 10 : dc until the end   (26)
Fastern off

Attach yellow yarn to the middle of the black cape (This is for tying a ribbon at the front). Put the black cape on Kiwararou and tie the yellow yarn into a ribbon


Hope you enjoyed the pattern :D

Crocheted Replica of Toy - Kiwatarou (極太郎) Amigurumi

My friend requested for a replica of a toy that is not in production anymore. It is a character called Kiwatarou (極太郎) designed by a Japanese artiste, Tsukasa, whom she likes a lot. Hope she is satisfied with the version I made!!

crocheted Kiwatarou (極太郎) amigurumi

crocheted Kiwatarou (極太郎) amigurumi